

Updated:
Good brooding gives broiler and layer chicks the best chance to start well. The first days are mainly about five things: heat, clean water, starter feed, fresh air and dry litter. When one of these fails, chicks can lose strength and growth very quickly.
This guide is written for practical farm use. It does not use one temperature, one mortality percentage or one brooder size as a rule for every flock. Chick strain, age, weather, house design, heat source and breeder guidance all matter.
What Is Chick Brooding?
Brooding is the management of young chicks until they can maintain body temperature more reliably and cope with the normal poultry-house environment. Artificial brooding replaces the warmth and protection that a mother hen would normally provide.
Commercial brooding should give chicks easy access to heat, feed and water without trapping them in a hot, smoky or poorly ventilated space.

Natural and Artificial Brooding
Natural brooding
A broody hen incubates eggs and later provides warmth and protection to her chicks. This works well for small numbers but gives the farmer less control over chick numbers, hygiene and the environment.
Artificial brooding
Artificial brooding uses equipment such as gas brooders, electric brooders, radiant heaters or other safe heat systems. It is the normal approach for larger flocks because the farmer can control the environment and monitor many chicks at once.
The best heat source is not simply the cheapest one. It must provide dependable warmth without creating fire, smoke or carbon-monoxide risk.
Equipment to Prepare Before Chicks Arrive
- reliable heat source;
- thermometer at chick level;
- chick feeders or feed trays;
- chick drinkers or properly adjusted nipple lines;
- clean, dry absorbent litter;
- brooder guard where needed;
- lighting sufficient for chicks to find feed and water;
- backup heat, power and water plan; and
- basic farm records for chick count, mortality, feed and water problems.
Heat-Source Safety
Electric, gas and other purpose-built brooders can work well when installed and maintained correctly. Charcoal or kerosene heat is still used on some farms, especially where electricity is unreliable, but combustion inside or close to a brooder requires extra caution.
- Never allow open flame or a hot appliance to contact litter, cardboard, curtains or other combustible material.
- Do not use a combustion heat source in a tightly enclosed, poorly ventilated brooder.
- Watch for smoke and poor air quality.
- Keep fuel, lamps and stoves where chicks cannot knock them over or crowd against them.
- Have a backup plan before power or gas fails, not after chicks begin chilling.
Fresh air is necessary even during brooding. The aim is warmth without drafts directly on chicks and without trapping moisture, smoke or harmful gases.
Prepare the Brooder House Before Arrival
- Remove the previous flock’s litter and waste. Do not place new chicks on dirty old litter.
- Clean first, then disinfect. Organic dirt reduces the effectiveness of many disinfectants. Use a poultry product according to its current label.
- Repair leaks, holes and equipment. Check roof, water lines, drinkers, doors and predator access.
- Place clean, dry litter. Choose material that absorbs moisture and does not contain mould or sharp material.
- Set up feeders and drinkers. Chicks should not have to travel far to find them.
- Preheat early enough. Warm the floor and litter as well as the air before chicks arrive.
- Test the backup system. Check generator, gas supply, spare bulbs, water reserve or other emergency provision.
For the wider disease-prevention system, use the Poultry Biosecurity guide.
How Warm Should the Brooder Be?
There is no single temperature table that fits every broiler and layer flock. Breeder companies publish starting temperature guidance for their own chicks, and the correct setting depends on floor temperature, air temperature, humidity, heat source, chick size and behaviour.
Use the current breeder or hatchery guide for the chicks you received as the starting target. Then adjust the environment by watching the birds.
What the Chicks Are Telling You
- Too cold: chicks crowd tightly under or near the heat source, pile together, make persistent distress calls or become inactive.
- Too hot: chicks move away from heat, spread toward the edge, may pant and can reduce feed intake.
- Draft or uneven heat: chicks gather mainly on one side rather than spreading evenly.
- Comfortable: active chicks are reasonably well distributed, moving between feed, water and resting areas.

Do not deliberately “go hotter just to be safe.” Overheating can dehydrate chicks and reduce feed intake just as underheating can cause chilling and piling.
Brooder Space and the Chick Guard
A brooder guard can help keep new chicks close to heat, feed and water during the first days, but there is no universal diameter that safely holds a fixed number of chicks.
Size the brooder area according to chick number, equipment layout, heat distribution and breeder guidance. The chicks should be able to move away from the heat source when they are warm and should not be forced to crowd around feeders or drinkers.
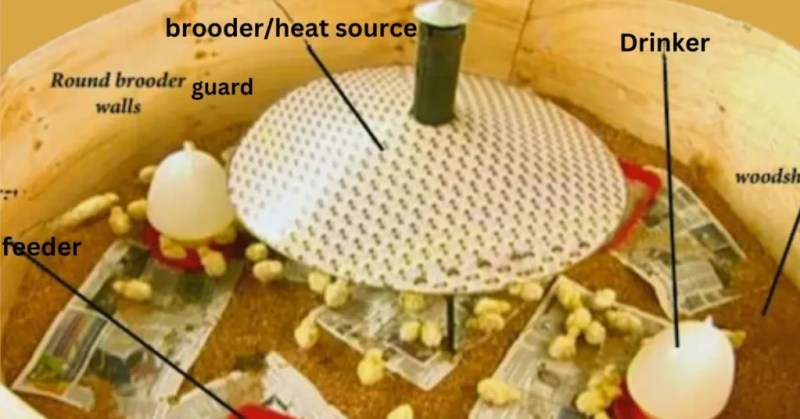
Expand the usable area as chicks grow and as their heat requirement falls. Do not wait for a fixed day if the birds have already outgrown the space.
What to Do When Chicks Arrive
- Count and observe the chicks. Record dead-on-arrival, weak or injured chicks and note transport condition.
- Place chicks gently. Distribute them near feed and water rather than dumping them in one pile.
- Give immediate access to clean drinking water. Do not force liquid into every chick’s beak. Show obviously confused chicks the drinker carefully if necessary.
- Provide fresh starter feed. Use trays or paper feeding where appropriate so feed is easy to find during the first hours.
- Watch distribution and activity. Correct obvious cold, heat, draft or water problems quickly.
- Check crop fill. A crop containing feed and water helps confirm that chicks have found both resources.
Water, Electrolytes and Supplements
Clean drinking water is essential from placement. Electrolytes or vitamin products may be useful in some transport- or heat-stress situations, but they are not automatically required for every flock and should not replace good water, heat and feed management.
Use a poultry product according to its label. Do not make the drinking water so concentrated, sweet, acidic or heavily supplemented that chicks drink less.
Feeding Broiler and Layer Chicks
Use a complete starter feed designed for the type of bird you are raising. Broiler and layer chicks do not necessarily require the same nutrient specification, and crude protein percentage alone does not define feed quality.
Follow the current feed-manufacturer or breeder guidance for the exact product. Make sure feed is fresh, protected from moisture and mould, and available to all chicks.
Do not automatically choose medicated feed simply because chicks are “not vaccinated”. Medication and vaccination programmes must fit the specific disease-control plan, hatchery history and products being used.
Crop-Fill and Early-Start Checks
During the first day, gently check a sample of chicks from different parts of the brooder. A crop that feels full and soft usually indicates that the chick has found feed and water. Too many empty crops suggest an access, temperature, lighting, chick-quality or placement problem.
Also watch:
- chick activity and sound;
- water use;
- feed disappearance;
- distribution in the brooder;
- wet litter or leaking drinkers;
- daily mortality; and
- weight and uniformity as the flock develops.
Do Not Use a Fixed “Acceptable Mortality” Percentage
Do not wait until mortality reaches a number such as 5% before investigating. The timing and pattern of deaths matter. A sudden cluster in a few hours can be more urgent than the same number spread across a longer period.
Compare the flock with the hatchery or breeder expectation, your own healthy previous flocks and the daily trend. Investigate cold stress, overheating, dehydration, chick quality, navel or yolk-sac problems, feed and water access, crushing, disease and other causes.
Use our Early Chick Mortality guide and Broiler Mortality guide for the investigation framework.
Litter Management During Brooding
Keep litter dry and friable. Wet or caked areas should be corrected quickly, especially around drinkers.
- repair leaks;
- adjust drinker height and pressure;
- remove badly wet or contaminated material where necessary;
- improve ventilation without chilling chicks; and
- do not cover a serious contamination problem repeatedly with fresh litter.
Wet litter can increase humidity, ammonia and disease pressure. It should be treated as a management warning, not just a housekeeping issue.
Ventilation Without Chilling Chicks
Young chicks need warmth, but they also need oxygen and dry air. A closed brooder can trap carbon dioxide, moisture, ammonia and combustion gases.
Provide steady air exchange while preventing cold air from blowing directly over chicks. If chicks are comfortable near the heat source but avoid one side of the brooder, check for a draft.
Lighting During Brooding
Chicks need enough light after placement to find feed and water. After the initial settling period, lighting programmes should follow the breeder recommendation, welfare requirements and the production system.
Do not copy one fixed 23-hour or 18-hour lighting programme for every broiler and layer flock. Broiler and layer lighting objectives differ.
Common Brooding Mistakes
- placing chicks before the floor and litter are warm;
- using room temperature alone and ignoring chick-level conditions;
- overheating “to be safe”;
- closing the house so tightly that air quality becomes poor;
- allowing too few chicks to reach feed or water at the same time;
- leaving wet litter around drinkers;
- using routine medicine without a defined reason;
- failing to test backup heat, water and power; and
- waiting for high mortality before investigating a changing flock.
When to Get Poultry-Health Help
Seek qualified help when mortality is rising, many chicks remain weak despite correcting the environment, there is severe diarrhoea, respiratory distress, swollen navels, neurological signs, unusual lesions or a sudden change in feed and water intake.
Do not diagnose disease from droppings colour, poor growth or one photograph alone.
Practical Brooding Checklist
- House cleaned and dried before placement.
- Heat system and backup tested.
- Floor and litter warmed before arrival.
- Feed and clean water ready before chicks are placed.
- Thermometer positioned at chick level.
- Chicks distributed near feed and water.
- Crop fill checked.
- Bird behaviour used to fine-tune heat.
- Wet litter corrected immediately.
- Daily mortality and major management events recorded.
Sources and Further Reading
- Aviagen — Ross broiler management resources
- Cobb-Vantress — Broiler management resources
- MSD Veterinary Manual — Poultry health guidance
- Poultry Affairs — Poultry Biosecurity guide
Important: Brooding targets vary with chick type, breeder guidance, house conditions and weather. Use the correct flock-specific starting guidance and adjust by chick behaviour, feed and water access, air quality and daily records.


